Sunday, March 18, 2012

Bailey's Irish Cream Cupcakes

Yesterday was St. Patrick's Day. I made the mistake of being in Chicago yesterday. If you've never had this experience, let me just say don't do it. It was CRAZY. I decided that I really hate drunk green people.

Even though I was away from home, I still found time to make some special treats for the day. For the adults, I made these Bailey's Irish Cream Cupcakes. I got the recipe from TidyMom and let me just say that they were absolutely amazing.

Here's how I made them:

Ingredients

For the Cupcake:

  • 1 Duncan Hines Moist Deluxe Dark Chocolate Fudge Cake Mix
  • 3 Large Eggs
  • 1/2 cup melted butter (not margarine)
  • 2/3 cup milk
  • 1/3 cup Bailey's Irish Cream


For the Chocolate-Caramel Ganache:

  • 10 ounces bittersweet chocolate, finely chopped
  • 3.5 ounces caramels (about 10-12 candies unwrapped)
  • 1 cup heavy whipping cream


For Bailey's Buttercream:

  • 1 cup shortening
  • 1 tsp vanilla extract
  • 8 cups powdered sugar
  • 1/3-1/2 cup Bailey's Irish Cream
  • 1/4-1/3 heavy whipping cream


Instructions

For the Bailey's Chocolate Fudge Cupcakes:
Preheat oven to 350 degrees. Using a large mixing bowl, add cake mix, eggs, butter, Bailey's, and milk. Mix on low until combined. Then mix on high for 2 minutes. Pour batter into paper lined cupcake pans. Bake for 20 minutes. Cool completely.

For Chocolate Caramel Ganache:
Place chopped chocolate in medium bowl and set aside. Using a medium sauce pan, heat whipping cream and caramels over medium-low heat, stirring occasionally, until caramels have melted completely. Pour caramel cream over chocolate and stir until melted.

For Bailey's Buttercream
In large mixing bowl, cream shortening and vanilla for 2-4 minutes. Add in powdered sugar, one cup at a time. Combine Bailey's with cream in measuring cup and slowly add to sugar mixture, using more cream for a creamier consistency and less for a stiff consistency.

To Assemble:
Using a sharp knife, cut out a cone shaped section of the cupcake and set it next to each cupcake. Fill each cupcake hole with ganache. Cut the top off of each cone and cap the ganache hole in each cupcake. Top cupcakes with the buttercream. Garnish with remaining ganache.

I was able to take the cupcakes with me to Chicago. My friends and I enjoyed them on the train ride up and in our hotel. Even though the streets were full of crazy drunk people, I did make my way through them and got to see the green Chicago River.

To quote Marshall Biggs in The Fugitive, "If they can dye the river green today, why can't they dye it blue the other 364 days of the year?"

Sunday, March 11, 2012

Peanut Butter and Jelly Cupcakes

I'm just going to come right out and say it ... I LOVE peanut butter. If I ever developed a peanut allergy, you might as well just shoot me. A good snack for me is a jar of peanut butter and a spoon.

I've made chocolate cupcakes with peanut butter buttercream many times ... and they never disappoint. So this time I thought I'd make a peanut butter cupcake. And what goes better with peanut butter ... other than chocolate ... then jelly.

This is what I came up with ...

I used Martha Stewart's peanut butter cupcake recipe.

Peanut Butter Cupcake
1 3/4 cups all-purpose flour
3/4 tsp baking powder
1/2 tsp salt
1/4 tsp baking soda
1 1/2 sticks unsalted butter, softened
1 1/3 cups sugar
2/3 cup creamy peanut butter
3 large eggs
1/2 cup sour cream
1/2 tsp pure vanilla extract

Make cupcakes as directed in Basic Cupcake How-To, adding peanut butter before adding eggs. use sour cream and vanilla as wet ingredients.

Peanut Butter Buttercream
1 cup butter, softened
1 cup creamy peanut butter
3 cups powdered sugar
2 tsp vanilla extract
3 tbsp heavy cream

Cream butter and peanut butter. Add powdered sugar and mix until combined. Scrape the bowl, mix on high speed for a minute, then add extract. Mix again before adding the heavy cream. Mix on high speed for 3 minutes.

Assembly
Put a dollop of jam (I used Smucker's Strawberry jam) on top of each cupcake. Then swirl the peanut butter buttercream around the jam.

These cupcakes were amazing. Nobody in my family could seem to eat more than one ... and then a big glass of milk was needed. I will definitely have to make these again.

Moo!

My friend Holly has three daughters. Being a mother of two boys, I can't even imagine having three girls. While I'm busy carting my boys to baseball practice and track meets, Holly is busy running her girls to dance competitions. That is such a foreign world to me.

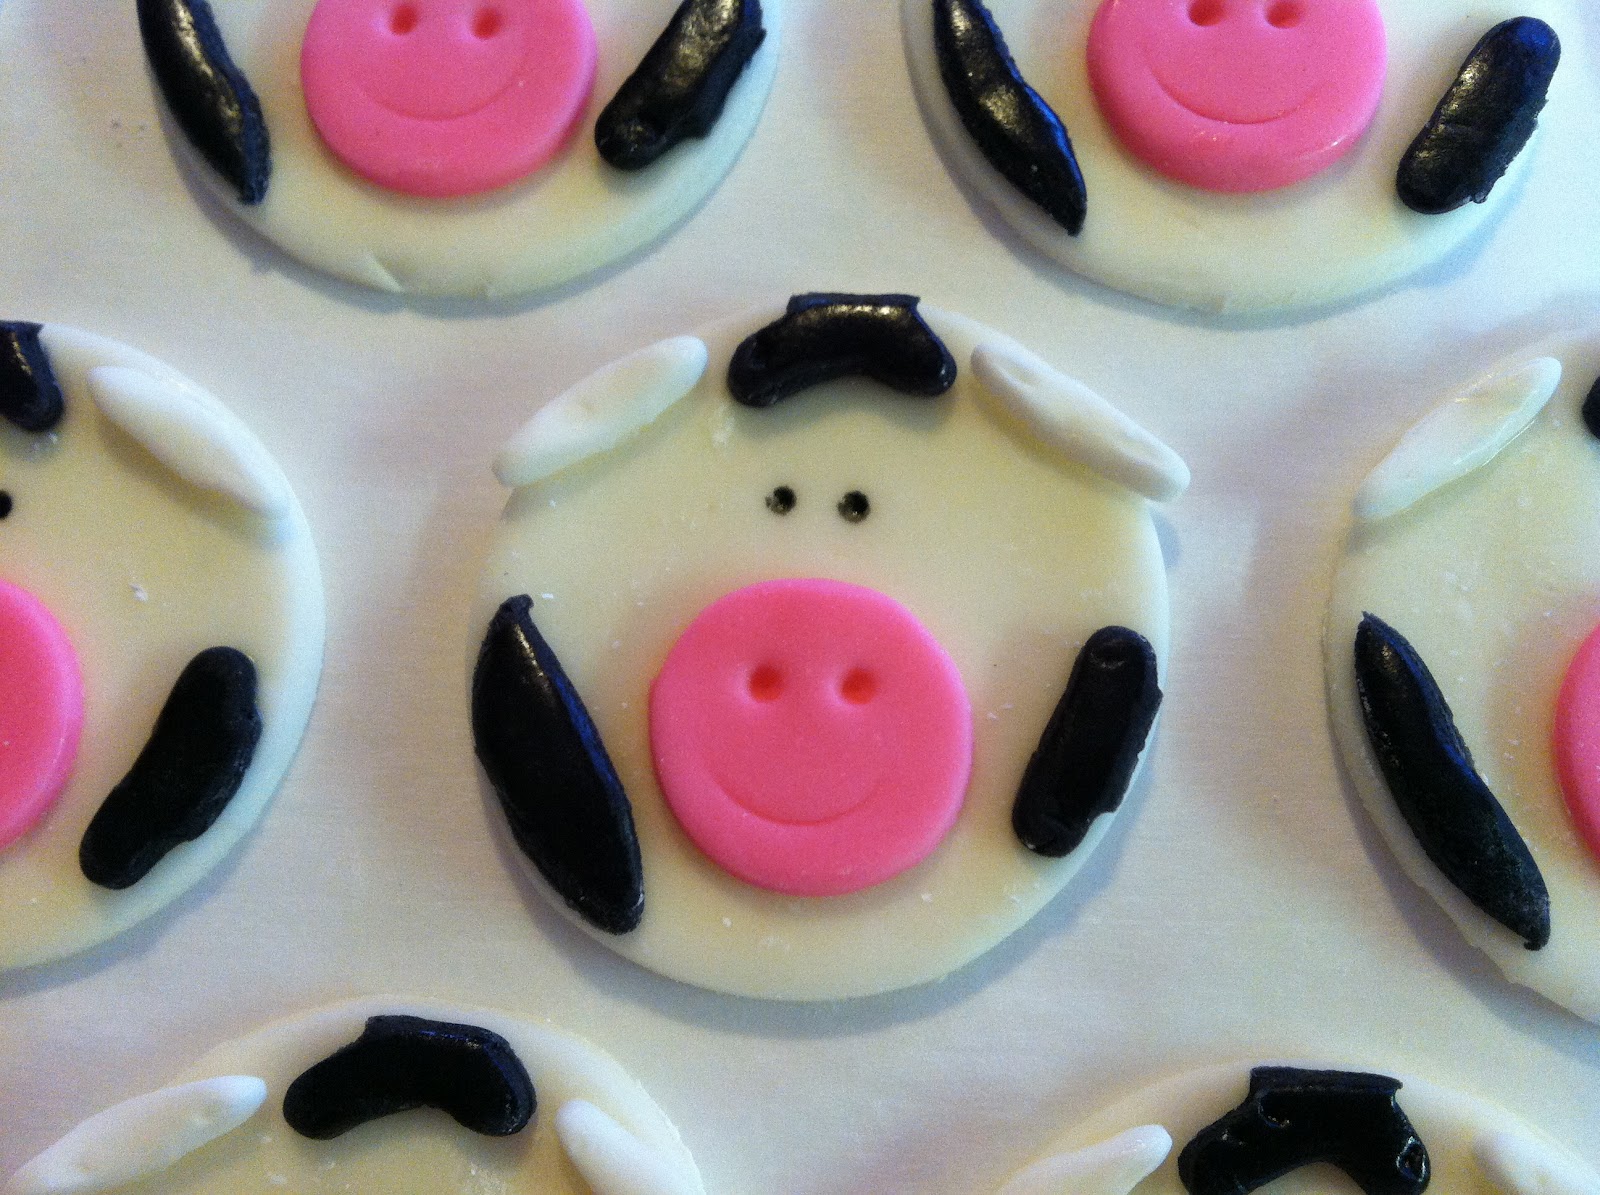
Today, Holly's oldest daughter is having her 11th birthday party and she asked me to make cupcakes for the event. Katie's favorite colors are lime green and blue, and she really likes cows. So, of course, I needed to make cow cupcakes.

Holly requested a vanilla cupcake, so I made my favorite vanilla cupcake recipe, which can be found here, and my favorite vanilla buttercream. The tricky part was the cows. Here's how I made them.

I started off with some marshmallow fondant that I had left over from my latest zebra cake. I rolled out the white, and using a round cookie cutter, cut out 30 white disks.

Next, I used a 1M tip to cut out pink disks for the cows' noses. The bottom of a small paint brush was the perfect size to make little nostril indentions. I then cut out cow spots from my black fondant.

I used my fondant letter cutters for some of the spots and for the ears. I used the letter "I" for the ears and the letter "K" for some of the spots. For the big spots, I just tried to cut random shapes. I'm really not good with random ... I have a degree in mathematics - I'm always looking for a pattern ... so the spots really took longer than they needed to. After "glueing" all the parts down,  I used a black food writer to make the eyes. I think the cows look very friendly.

When it came time to assemble these little cuties, I loaded a piping bag fit with a grass tip up with "lime green" frosting. It looked lime green in the piping bag, but not so much on the cupcake.

Cows graze in grass ... right? So covering the cupcakes with "grass" seemed like the right idea.

While the icing was still wet, I carefully placed a cow disk on the top.

To complete the look, I piped a "K" for Katie on top of the non-face cupcakes.

Katie's response to the cupcakes ... "Those are the coolest things ever!"

Happy Birthday Katie!!!!

Sunday, February 26, 2012

A Cup of Coffee ... Cake

This morning I tried something new for the boys for breakfast ... coffee cake in a cup. I found the recipe on Pinterest, so I really need to thank Prudent Baby. According to her blog, this should only take 5 minutes. Maybe it was because I was taking pictures along the way, but it took me 20 minutes to prepare this little concoction. Maybe I'm not as organized as I think. Or maybe it's because I made 3 of them. Who really knows?

Anyway, here's how I made this ...

First, make the crumb topping. In a small bowl mix (with your clean fingers) 1 tablespoon of butter, 2 tablespoons of flour, 1 tablespoon of brown sugar, and 1teaspoon of cinnamon.

Set the crumb topping aside and start in on the coffee cake.

Place a tablespoon of butter in a cup and soften it in the microwave for 10-15 seconds.

Stir in 2 tablespoons of sugar.

Now it's time for the egg. This can be made without the egg, but it will be more crumbly. You only want to use half an egg per cup. Just crack it in a separate cup, mix it up, and poor half in. If you're making 2 cups of coffee cake, this works out well. I ended up throwing away the other half egg.

Next stir in 2 tablespoons of sour cream and a few drops of vanilla.

Stir in 1/4 cup of flour, 1/8 teaspoon of baking powder, and about 1/2 teaspoon of cinnamon. Try not to stir too much. The cake can get stretchy and a little chewy if you stir the flour too much.

Add the crumb topping mixture to the cup.

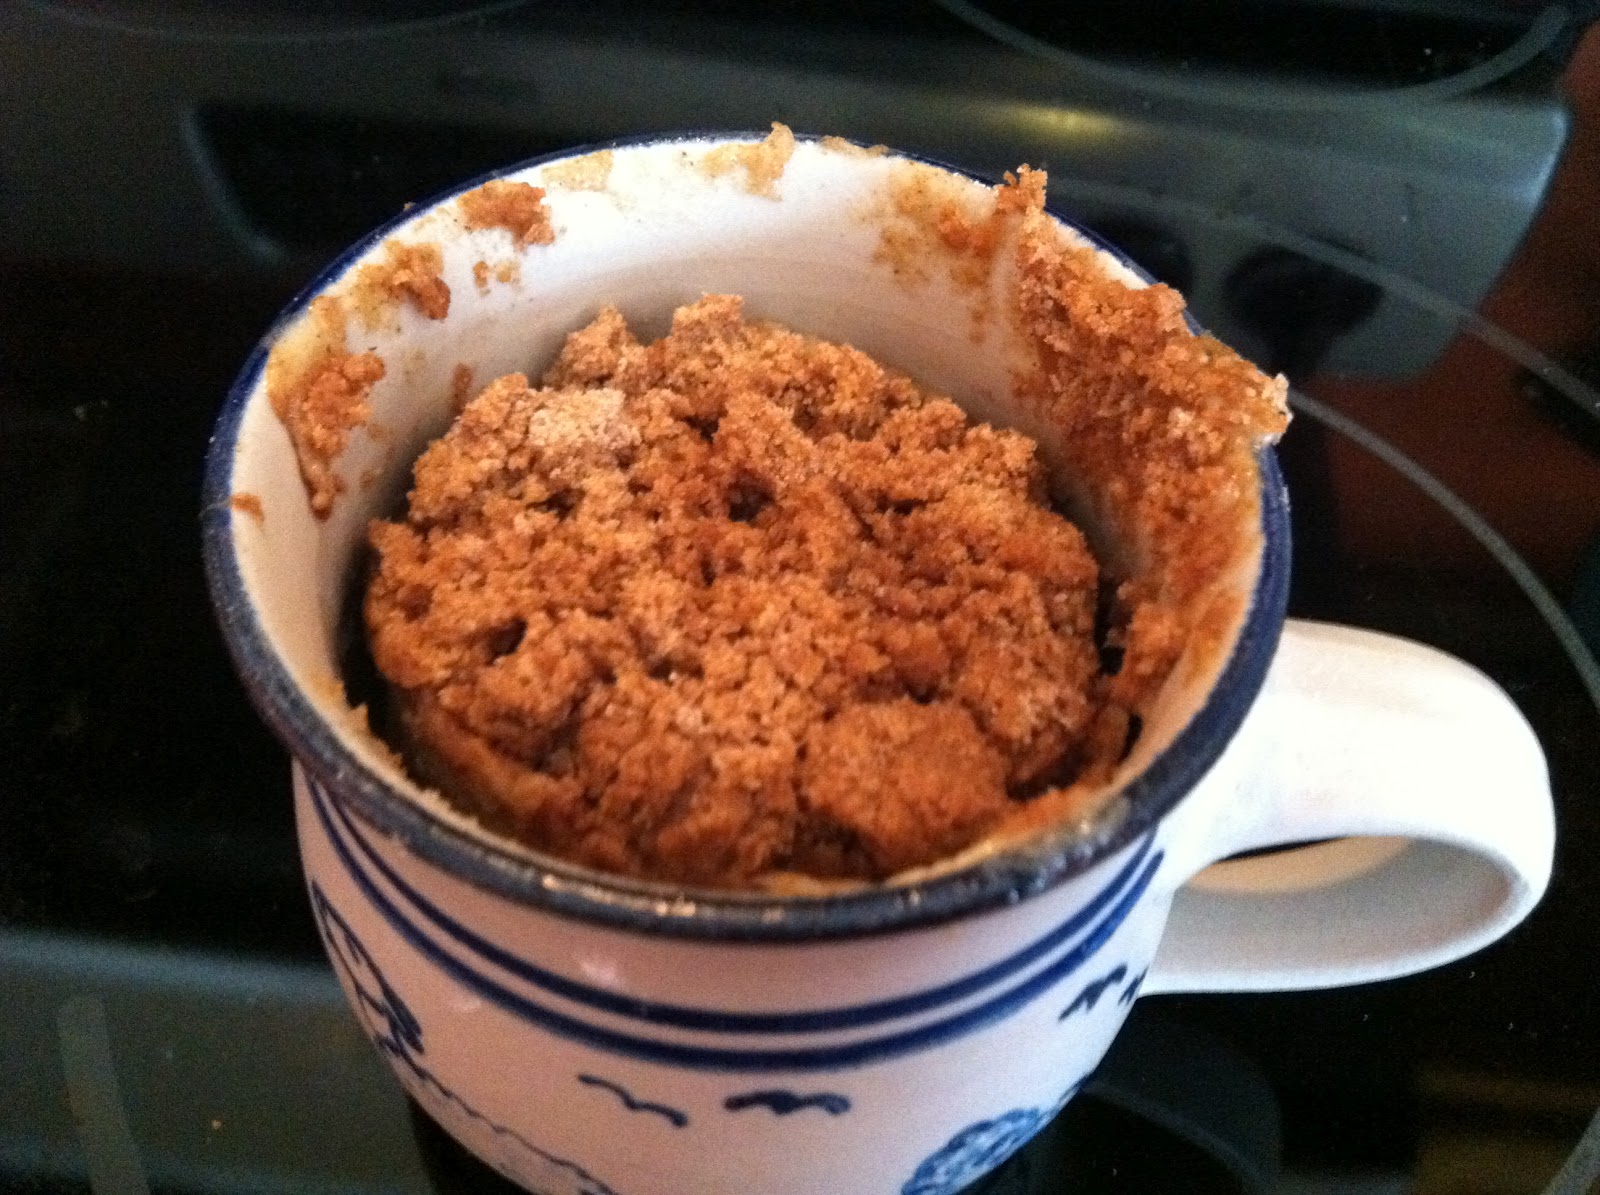
Here comes the fun part. Place the cup in the microwave for 1 minute. You'll see the cake rise up to the top. After a minute, heat it again in 10 second intervals until the cake is how you want it. I ran mine for 1 minute and 20 seconds. It raised up nicely in the heat and crumb topping spilled over in my microwave because I used a small cup. After the heat was off, the cake sank back down into the cup.


I kind of wish I would have wiped the cup off before I took the picture. Oh well ... it tasted good anyway.

A quick way to have a little something sweet for breakfast ... or any time of the day. You can vary the recipe as well. Try a little cocoa powder instead of cinnamon. Try some canned pumpkin or cream cheese instead of sour cream. The possibilities are endless.

Monday, February 20, 2012

Chocolate Chip Cookie Dough Truffles

Since today is a holiday and I don't have to work, I decided that I needed to get rid of all the extra cupcake "stuff" I have sitting around. I'm going to try to use up some of the frostings I have sitting around by decorating the cupcakes in the freezer, then I'm going to send them to school with my son tomorrow. He can be Mr. Popular with the girls by handing out cupcakes.

I also had some extra cookie dough filling left over from my Chocolate Chip Cookie Dough cupcakes. So I decided to make some Cookie Dough Truffles.

The recipe for the cookie dough can be found here. I then melted some baking chocolate and dipped the cookie dough balls in it. Simple.

After the chocolate hardened, I melted some white chocolate chips and drizzled it over the top to make them look pretty. Even though I'm trying desperately to lose 1 more pound to reach my goal, I had to try one.

OMG! THEY TASTE AMAZING!

I made 20 truffles, but I don't think there will be any left over tomorrow. The boys thought they were pretty awesome.


Chocolate Chip Cookie Dough Cupcakes

During last months cupcake-a-palooza I was looking for recipes that were rich and ooey and gooey. I was successful in this endeavor. One of the crowd favorites was was this ...
Chocolate Chip Cookie Dough Cupcake

I got the recipe for Annie's Eats. It was a bit time consuming, but well worth it. Here's what I did ...

Ingredients:
     For the cupcakes:
     3 sticks unsalted butter, at room temperature
     1 1/2 cups light brown sugar, packed
     4 large eggs
     2 2/3 cups all-purpose flour
     1 tsp baking powder
     1 tsp baking soda
     1/4 tsp salt
     1 cup milk
     2 tsp vanilla extract
     1 cup chocolate chips

     For the filling:
     4 tbsp unsalted butter, at room temperature
     6 tbsp light brown sugar, packed
     1 cup plus 2 tbsp all-purpose flour
     7 oz sweetened condensed milk
     1/2 tsp vanilla extract
     1/4 cup mini semisweet chocolate chips

     For the frosting:
     3 sticks unsalted butter, at room temperature
     3/4 cup light brown sugar, packed
     3 1/2 cups powdered sugar
     1 cup all-purpose flour
     1/4 tsp salt
     3 tbsp milk
     2 1/2 tsp vanilla extract

     For the garnish:
     Tiny chocolate chip cookies
     Mini chocolate chips

Directions:
To make the cupcakes, preheat the oven to 350 degrees. Line the cupcake pans with paper liners (4 total). In the bowl of a stand mixer fitted with the paddle attachment, combine the butter and brown sugar. Beat together on medium-high speed until light and fluffy, about 3 minutes. Mix in the eggs one at a time, beating well after each addition and scraping down the sides of the bowl as needed.

Combine the flour, baking powder, baking soda, and salt in a medium bowl. Stir together to blend. Add the dry ingredients to the mixer bowl on low speed, alternating with the milk, beginning and ending with the dry ingredients, mixing each addition just until incorporated. Blend in the vanilla. Fold in the chocolate chips with a spatula.

Divide the batter evenly between the prepared cupcake liners. Bake for 18-20 minutes, until a toothpick inserted in the center comes out clean. Allow to cool in the pan 5-10 minutes, then transfer to a wire rack to cool completely.

To make the cookie dough filling, combine the butter and sugar in a mixing bowl and cream on medium-high speed until light and fluffy, about 2 minutes. Beat in the flour, sweetened condensed milk and vanilla until incorporated and smooth. Stir in the chocolate chips. Cover with plastic wrap and refrigerate until the mixture has firmed up a bit, about an hour.

To fill the cupcakes, cut a cone shaped portion out of the center of each cupcake. Fill each hole with a chunk of the chilled cookie dough mixture. I found that the filling was so thick that I just used my clean fingers to poke as much in the cupcake as I could.

To make the frosting, beat together the butter and brown sugar in the bowl of a stand mixer fitted with the paddle attachment until creamy. Mix in the powdered sugar until smooth. Beat in the flour and salt. Mix in the milk and vanilla extract until smooth and well blended.

Frost the filled cupcakes as desired. I used a 1M tip to put a nice swirl on top. I then sprinkled with some mini chocolate chips a stuck a mini chocolate chip cookie on top.


These cupcakes are very dense, rich, and delicious. After I got all the parts made, assembly didn't take very long at all.

I found that both kids and adults really liked this cupcake.


Wednesday, February 15, 2012

Cupcake Bouquet

Monday night was the Pops Concert / Dessert Auction at school. This is an annual fund raiser that the choir booster hold to raise money for camp scholarships. During this event, five different choirs (6th grade - 12 grade) sing, with desserts being auctioned off in between choirs. Both of my boys are in choir, so of course I wouldn't miss it. It's crazy and loud and a huge money maker for the choir.

This year I entered two items in the auction. My cupcakes have been gaining some attention over the past few months, so I wanted to make sure I brought my A-game. The item I worked the hardest on was my Cherry Coke Cupcakes. I had a dozen cupcakes arranged around four cans of coke and all in a clear plastic cake box that I bought at the local grocery store bakery. I really was not prepared for the attention these cupcakes got. They were one of the last items to be auctioned and they went for ... wait for it ... $200. My jaw was on the floor as I watched the bidding sore past $100. The last bid I heard was $125 before Erin, the junior high choir director yelled $200. She's one of my biggest cupcake fans. I was in shock. I found out later that those cupcakes went for the highest dollar amount of the night.

The other item I entered in the auction was this ...


... a rose bouquet made of cupcakes. I have been wanting to try one of these for a while now, so I seized this opportunity. With it being Valentine's week, I had made close to 100 cupcakes over the weekend. This is what I did with the extras. The white roses are red velvet cupcakes, the pink are vanilla cupcakes, and the red are chocolate cupcakes.

Even though the Cherry Coke Cupcakes went for more money, I got more compliments for these cupcakes. At the auction, this bouquet was auctioned early in the evening. My friend Sharon, who plays the piano for all of the choirs, and who I've given cupcakes to in the past just because I think she's cool, ended up winning them. I was amazed that these "extra" cupcakes went for $85.

All in all, it was a really exciting night.

Since so many people asked me how I made the bouquet, I thought I'd make a pictorial tutorial. So, here goes ...

The first thing I did was buy a pot and a styrofoam ball that fit in it nicely. I really had no idea how expensive styrofoam balls were. Who new?

To assemble, I inserted 2 toothpicks into the ball right next to each other and then slid a cupcake down onto the toothpicks. I continued around the bottom of the ball until I had made it all the way around the pot.


I tried really hard to not leave space in between the cupcakes. I also just randomly picked up cupcakes so that the flavors were all mixed up.

Then I started on the next row up and kept going until I had covered the whole ball.


I had to do a little squeezing at the top so as to not leave a huge gap on the top. I was able to get 29 cupcakes on this one. The math geek in me immediately began stressing over the fact that 29 is a prime number. Who has a bouquet with 29 flowers in it? Who gives someone 29 cupcakes? Oh well ... 29 it was.

Next up ... icing the cupcakes.

I started off by just making a batch of my favorite vanilla buttercream. I just left it white so that I could ice the red velvet cupcakes.


To make the roses, I use a 1M tip. Just start in the middle of the cupcake and swirl out to the edge. I tend to make counterclockwise swirls. There are many great tutorials on YouTube for learning this technique.

I then put some pink gel coloring in the buttercream to tint it all pink for the vanilla cupcakes.


Next up, red coloring was add to the pink to make a nice red rose color for the chocolate cupcakes.


I was a little unhappy with some of the gaps between the cupcakes ... so ... I got some green tissue paper to use as filler. I cut it into squares and used an ink pen to carefully poke it into the gaps.

And it made a lovely centerpiece for my table ... overnight ... until I had to take it to school for the auction.


This bouquet had a "wow" factor. At the end of the evening, I saw Sharon's daughter, Kimmi, walking out with a pot and styrofoam ball with empty toothpicks sticking out of it. There were a few cupcakes left, but there were plenty of them gone. I really hope Sharon got some for herself ... because like I said before, I think she's cool.

I hope to make one again with different kinds of flowers on it. With it being Valentine's Day, the roses just seemed appropriate.